

A bathroom accent wall is a game-changer for any home remodel. It is the perfect opportunity to add personality and visual flair without committing to a full-room overhaul. Many homeowners struggle with where to begin, feeling overwhelmed by choices like tile, paint, or wood. The goal is a feature that draws the eye and complements the room’s existing fixtures. You want something simple, affordable, and impactful. This listicle provides 27+ creative, budget-friendly Bathroom Accent Wall ideas to transform your bathroom from basic to beautiful. You can achieve a custom, designer appearance using simple DIY techniques. Get ready to find the perfect style for your space, whether you are renting or owning.
30 Stylish Bathroom Accent Wall Ideas You’ll Enjoy
1. Geometric Stencil Paint
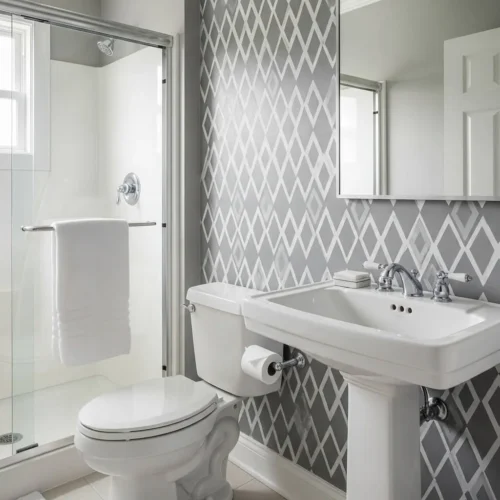
Geometric stencils are a simple way to create a high-impact accent wall. This idea offers the appearance of wallpaper without the high material cost or tricky installation. You only need a can of paint in your chosen accent color and a reusable stencil. Pick a pattern that suits your style, like honeycomb, chevrons, or a simple stripe. Measure carefully to ensure the pattern aligns across the wall for a professional result. The base color can be your existing wall color, or you can paint a contrasting background first. This is a very budget-friendly DIY that can be completed in a weekend. Small bathrooms benefit greatly from bold patterns, making the space appear more interesting. Practice on cardboard before starting on the wall itself. This process gives you a feel for the paint consistency and stencil technique.
2. Weathered Wood Plank Wall
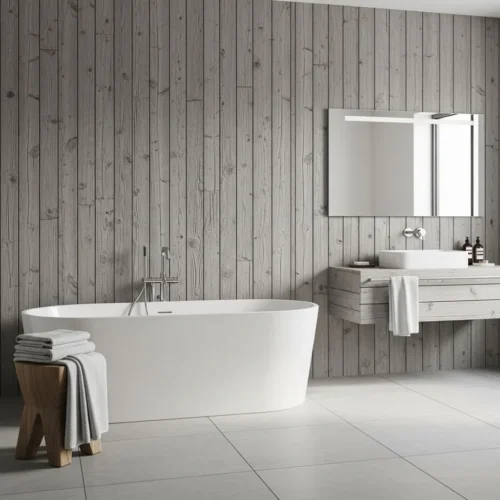
A weathered wood plank wall brings rustic warmth and texture to a sterile bathroom. This design works exceptionally well in farmhouse or coastal-style homes. You do not need expensive reclaimed wood. Pallet wood or inexpensive fence pickets can be treated, stained, and cut to create the appearance of salvaged material. If you use pallet wood, make sure it is safe and properly cleaned. For an easier approach, purchase faux wood planks that simply peel and stick to the wall. Install the planks either vertically for a taller look or horizontally for a wider feel. Use a sealant designed for high-humidity areas to protect the wood from moisture. This project requires basic measuring and cutting skills. The natural irregularities of the wood add a unique, handmade character. It is an affordable way to add architectural depth.
3. Subway Tile in a Vertical Stack
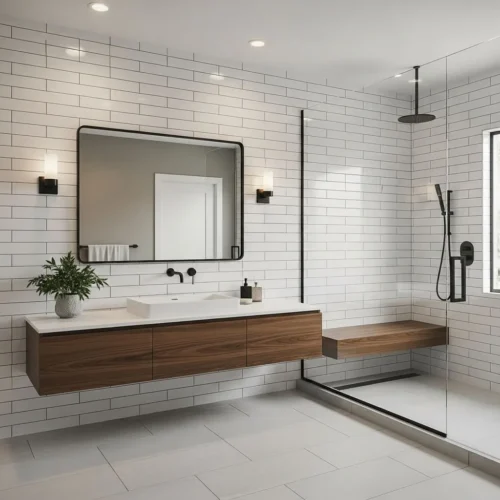
Subway tile is a classic choice, but installing it in a vertical stack pattern makes it feel modern and unexpected. Instead of the traditional staggered brick pattern, lay the tiles one directly above the other. This simple change in orientation immediately updates the look. White subway tiles are very inexpensive and readily available at home improvement stores. The impact comes from the contrasting grout color. Use a dark gray or black grout with white tiles to emphasize the linear design. This vertical arrangement also draws the eye upward, making the ceiling seem higher. While tiling is more involved than painting, it is an achievable DIY project. Take your time with the tile cutter and use plenty of spacers. A tiled wall is durable and easy to clean, making it practical for wet areas.
4. Chalkboard Paint Wall
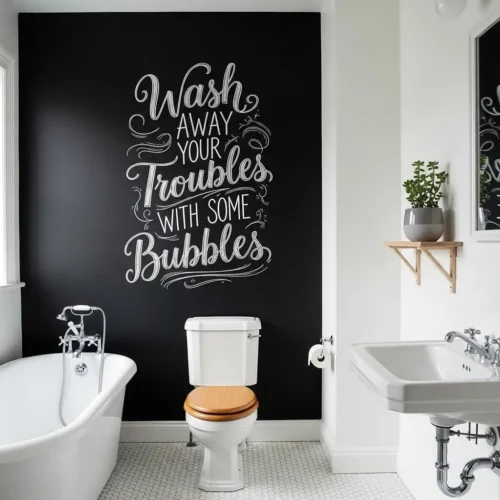
Chalkboard paint offers a playful and fully customizable accent wall. It is an excellent choice for a kids’ bathroom or a quirky powder room. The matte black finish is sophisticated on its own, providing a bold contrast to light fixtures and trim. The best part is the ability to change the design instantly. Use colored chalk to draw temporary art, write motivational quotes, or leave messages for family members. This keeps the bathroom feeling new and engaging without repainting. Chalkboard paint is very simple to apply and covers well in two coats. It can be found in most paint stores. Make sure to properly prime the wall before application for the best adhesion. It is a very low-cost idea that adds an element of fun interaction.
5. Peel-and-Stick Wallpaper
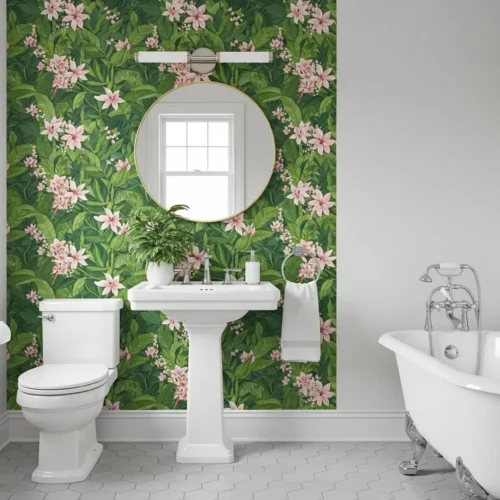
Peel-and-stick wallpaper is the ultimate solution for renters or those who fear commitment. It offers the full dramatic effect of wallpaper without the messy paste or permanence. Choose from countless patterns, from bold florals to subtle textures like faux grasscloth or shiplap. This material is designed to be removable without damaging the paint underneath. This makes it perfect for experimenting with trends. Measure your wall accurately and purchase enough rolls to match the pattern repeat. Installation is a patient process of aligning panels and smoothing out air bubbles. Use a plastic squeegee tool for the best results. Compared to traditional wallpaper, the peel-and-stick variety is much simpler for a beginner DIYer. This is an immediate, high-style transformation.
6. Board and Batten Paneling

Board and batten paneling adds classic architectural detail and texture to a bland bathroom. This design consists of thin wood strips applied directly to the wall to create a pattern, usually squares or rectangles. It is much simpler and cheaper than full wainscoting. You can purchase inexpensive thin lumber or medium-density fiberboard strips for the battens. Use a level and a measuring tape to plot out your pattern before attaching the strips with construction adhesive and small nails. Once the pieces are installed, caulk all the seams and paint the entire wall, including the battens, a single color. White paint is timeless, but a dark charcoal or navy can create a dramatic statement. This DIY project gives a custom, high-end feel for very little money.
7. Faux Brick Veneer

For an urban loft or industrial look, consider a faux brick accent wall. Modern brick veneers are thin, lightweight, and much easier to install than full-sized bricks. They are often sold as individual tiles or in large, interlocking panels. Choose a white-washed brick for a lighter, softer appearance, or a classic red brick for more drama. The installation requires adhesive and, for a realistic finish, applying mortar or grout between the pieces. This adds to the authentic, textured appearance. Veneer panels are the fastest DIY option and often just screw into the wall. This material adds significant visual weight and texture. It works especially well behind a sleek, minimalist vanity or tub.
8. Mirror Tile Mosaic

Create a sparkling, glamorous accent with a mirror tile mosaic. This option immediately makes a small bathroom feel larger and brighter by bouncing light around the space. You can purchase small, affordable mirror tiles with adhesive backing. Choose from square, subway, or even hexagon shapes. For a simple design, cover the entire accent wall. For a more subtle effect, create a framed border or a vertical stripe. This DIY requires a steady hand for alignment. Ensure the wall is perfectly clean before applying the tiles for the best adhesion. The resulting wall acts as a functional mirror and a dramatic piece of art. It is a stunning, unexpected way to use reflective surfaces.
9. Bold Color Block Paint

Color blocking is a simple, modern painting technique that creates instant visual drama. Instead of painting the whole wall one color, use two or three distinct shades to create geometric sections. A popular look is painting the lower third a dark, grounding color and the top two-thirds a lighter, complementary shade. Use high-quality painter’s tape to create crisp, clean lines. A level is essential to ensure your dividing line is perfectly straight. This is a very affordable DIY that can completely change the mood of the room. Choose colors that contrast sharply for a graphic appearance or shades that are close on the color wheel for a subtle change. The result is a custom look without specialized materials.
10. Simple Shiplap Paneling

Shiplap brings a coastal, farmhouse, or cottage charm to any space. It consists of horizontal wooden boards with a slight gap between them, creating clean lines and texture. Buy thin plywood sheets and have them ripped into uniform strips at the hardware store to save money. This is much cheaper than purchasing pre-milled shiplap boards. Attach the strips directly to the wall using a construction adhesive and small nails. Use a coin or a tile spacer to ensure consistent gaps between each plank. Paint the finished wall with semi-gloss white paint, which is durable and easy to wipe clean. The shadows in the gaps provide subtle texture, making the flat wall feel dimensional. It is a classic accent that is easy for a DIY beginner.
11. Custom Wall Mural Decal

A custom wall mural decal is a powerful way to add a large piece of art to the bathroom. Unlike traditional wallpaper, these decals often feature a single, large image or scene. You can find murals depicting everything from abstract designs to realistic forests or cityscapes. Look for high-quality vinyl decals designed for easy application. Many companies offer custom sizing to fit your specific accent wall dimensions. Since it is one large piece, the installation is often quicker than patterned wallpaper. Ensure the wall is smooth and clean before application to prevent bubbling. This is a great solution for creating a focal point with deep color and visual interest. It offers a sophisticated, art gallery feeling.
12. Geometric Wood Trim Pattern

Use thin strips of wood trim to create a geometric design directly on your wall. This technique gives the appearance of expensive millwork. The pattern options are endless: a simple X design, layered rectangles, or complex diamond shapes. Purchase the thinnest, inexpensive trim pieces you can find. A miter box and saw are needed to cut precise angles for the corners. Use construction adhesive and a few finishing nails to secure the pieces. The key to this look is painting the entire wall and the trim the exact same color. This makes the texture the star, not the different materials. A dark, moody color works best to enhance the shadows created by the raised trim.
13. High-Gloss Paint
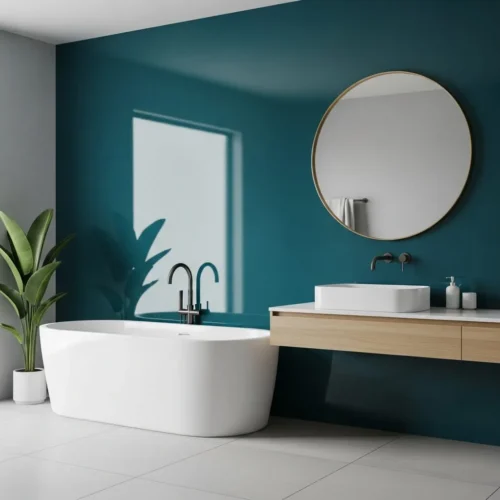
While flat or matte paint is common, a high-gloss finish on a single accent wall adds a touch of luxury and intense depth of color. The glossy sheen catches the light and makes the color appear richer and more vibrant. This works best with deep, saturated colors like emerald, navy, or black. Preparation is key for this project. High-gloss paint magnifies every imperfection, so you must fill all holes and sand the wall perfectly smooth. Apply a good primer and two to three thin coats of the glossy paint. The downside is that it takes more effort to prep, but the result is stunning and easy to clean. The reflective quality is a simple way to make a space feel higher-end.
14. Large Format Tile

Instead of small, detailed tiles, opt for large-format tiles for a modern, seamless look. Tiles that are 12×24 inches or even larger minimize grout lines. This makes the wall appear less busy and more expansive. Choose a tile with a subtle texture or a faux stone finish, like a pale marble or concrete look. Because the tiles are larger, installation is often quicker, though they are heavier and require more careful handling. The minimal grout lines mean less maintenance and a sleek surface that is easy to wipe clean. Large tiles work well in both small and big bathrooms, adding an uncluttered sense of sophistication. This style mimics the look of solid stone slabs at a fraction of the price.
15. Painted Vertical Stripe

Vertical painted stripes are a classic design element that works wonders in a bathroom. They are a simple optical illusion that adds height and structure. Use high contrast colors, such as a dark color and white, for maximum effect. Alternatively, use two closely related shades for a subtle, textural stripe. You will need a tape measure, a level, and high-quality painter’s tape to achieve sharp lines. Start by painting the entire wall the lighter of your two colors. Once dry, measure and mark the width of your stripes, then carefully apply the tape. Seal the edges of the tape with a thin coat of the base color before painting the accent color. This simple step prevents the second color from bleeding under the tape.
16. Sea Glass Mosaic

Bring a coastal and textural feel to your bathroom with a sea glass mosaic. This is an excellent project for DIYers who are patient and creative. You can purchase bags of tumbled, frosted glass pieces in various colors. Use a clear or light-colored grout to adhere the pieces to the wall in a random or deliberate pattern. Alternatively, you can buy pre-made mesh-backed sea glass mosaic sheets, which are much faster to install. The frosted texture of the glass is beautiful and catches the light softly. This creates a spa-like, calming atmosphere. This is ideal for a shower niche or a smaller accent area behind the sink. It is a unique, handmade look.
17. Basket Wall Display
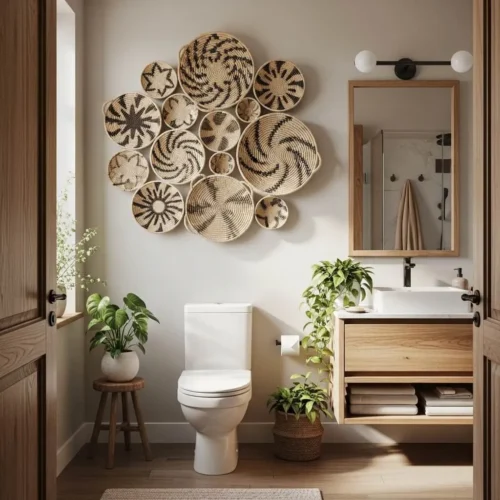
For an easy, non-permanent accent, use a collection of woven baskets. This idea is perfect for renters as it only requires a few small nails or removable adhesive hooks. Gather baskets of different sizes, textures, and neutral colors. Arrange them on the wall in an asymmetrical cluster, experimenting with placement on the floor first. You can find inexpensive woven baskets at thrift stores, flea markets, or craft shops. This adds bohemian texture and global flair to the space. It is a simple, affordable way to create a large-scale art installation without painting or tiling. The baskets should be lightweight and easy to hang.
18. Pegboard Wall System
A pegboard wall is a fantastic, functional accent wall that adds utility and visual interest. Paint the pegboard in a color that matches your bathroom’s trim or a bold, contrasting shade. Install it securely to the wall, leaving a small gap for the pegs to insert. The beauty of the pegboard is its versatility and easy customization. You can add shelves, hooks, and small baskets in any arrangement you like. Use the wall to store extra towels, display small decorative items, or keep frequently used items handy. This is a very budget-friendly and practical DIY. It provides an ever-changing display area that can be reorganized instantly.
19. Dark-Stained Beadboard

Beadboard is a traditional paneling style known for its narrow vertical grooves. While it is often painted white, staining it a deep, dark color creates a rich, sophisticated accent wall. A dark stain like walnut or espresso adds immediate depth and warmth. You can buy beadboard in large, affordable sheets that are easy to cut and install. Once the paneling is attached with adhesive and small nails, apply your chosen wood stain. Be sure to use a polyurethane sealant for protection against humidity. The vertical lines add height, and the dark color makes the white fixtures pop. This is a classic look with a modern twist.
20. Stamped Concrete Finish

Faux concrete finishes are a popular way to achieve a sleek, industrial, or minimalist look. You do not need real concrete; there are specialty paint kits and plaster products that mimic the appearance of concrete perfectly. These materials are applied with a trowel or sponge to create the subtle texture and color variation of actual concrete. Choose a light gray for an airy look or a dark charcoal for a moody effect. This DIY project is textural and tactile. It requires a bit of practice to achieve the desired finish. The result is a simple, raw, and modern wall that complements minimalist fixtures.
Explore more design inspiration in our other accent wall ideas
to complete your bathroom makeover.
21. Hand-Painted Polka Dots

For a fun, whimsical accent, try hand-painted polka dots. This is a simple, forgiving DIY project that requires very little skill. Use a stencil, or even simpler, the bottom of a small plastic cup as a template for perfectly round dots. Choose a bold, contrasting color, or try a subtle metallic shade like gold or silver. The metallic paint adds a little shimmer. The dots can be evenly spaced for a tailored look or scattered randomly for a more carefree style. The small irregularity of a hand-painted design adds character. This is a great, low-commitment project for a powder room. It adds a touch of retro charm and is very inexpensive.
22. Wall of Built-In Shelving
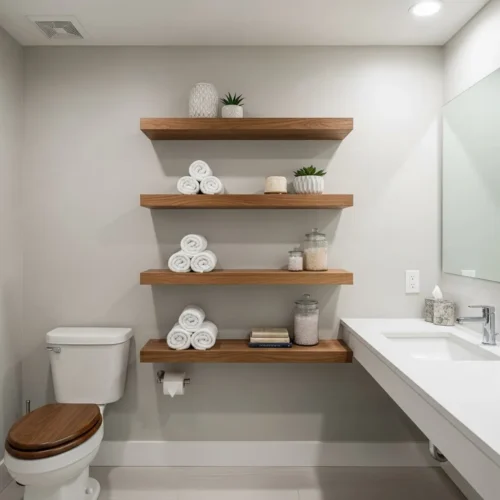
Transform your accent wall into a functional display and storage area. Build or install three to five simple floating shelves across the width of the wall. Space them evenly for balance. Paint the wall a different color than the shelves to help them pop. The shelves themselves can be inexpensive pine lumber stained or painted. Use the shelving to display rolled towels, small plants, decorative bottles, or art. This adds both form and function to a previously blank space. It is an excellent way to organize and declutter a small bathroom. Proper installation of the brackets is key to ensuring the shelves can hold weight.
23. Dark Grout with Light Tile

If you like the look of classic white tile but want a bolder statement, use dark grout. Applying a charcoal gray or black grout to simple white subway, hexagon, or penny tiles dramatically outlines the shape of each piece. This emphasizes the pattern and adds a graphic, grid-like appearance. White tiles are very inexpensive, so the added cost is just the darker grout. This works especially well in a shower enclosure or behind a vanity. The dark grout also has the practical benefit of hiding stains and mildew better than white grout. This simple material switch makes a huge visual difference.
24. Vertical Mirror Panels

Install a series of tall, narrow, framed or frameless mirrors side-by-side on your accent wall. This creates the illusion of a much larger, brighter space. The repetition of the vertical shape adds drama and height. You can purchase inexpensive full-length mirrors and simply remove the backings, or look for budget-friendly mirror tiles. Paint the wall color between the mirrors a bold, striking shade to make the reflections stand out. The mirrors act as functional reflection points and a unique architectural feature. This works best on a wall that receives good light.
25. Tiled Herringbone Pattern

The herringbone pattern involves laying rectangular tiles (or planks) in a zig-zag arrangement. This creates an elegant, visually rich pattern that is much more complex than a standard grid. You can use standard subway tiles, but the pattern is especially striking with long, thin tiles or wood planks. The installation requires careful measurement and many diagonal cuts, so it takes patience. The resulting pattern is a beautiful focal point. Use a light-colored grout to subtly highlight the intricate pattern. This look works in both traditional and modern bathrooms. It is a sophisticated use of simple materials.
26. Sponge Painting Texture

Sponge painting is a very easy and forgiving faux finish that adds subtle texture and depth. Choose two colors that are close in tone, such as a light gray and a slightly darker gray, or two shades of beige. Paint the entire wall with the lighter base color. Once dry, dab the second, darker color onto the wall using a natural sea sponge or a synthetic sponge. Use a light touch and blend the colors as you go. This breaks up a plain painted wall without the commitment of wallpaper. It creates a soft, almost stucco-like appearance. This is a cheap and easy DIY that requires no special tools.
27. Simple Picture Frame Molding
Create the look of formal wainscoting with simple picture frame molding. This involves attaching thin, inexpensive strips of wood molding in various rectangular shapes directly to the wall. The frames do not need to hold pictures. They are a decorative architectural detail. Once the frames are attached with adhesive and nails, caulk all the seams where the wood meets the wall. Then, paint the entire wall and the molding the same color. A dark, moody color works best to highlight the shadows and dimension. This is a very affordable DIY that adds instant historic character and formality.
28. Painted Arches or Shapes

Use paint to create large, graphic shapes instead of covering the whole wall. A popular trend is the painted arch. Use a string tied to a pencil to draw a perfect half-circle. Then, carefully paint inside the line to create a large, colorful arch shape. You can paint one large arch or a series of overlapping arches. Other shapes, like circles or large triangles, also work well. This is a quick and effective way to create a custom piece of wall art. It allows you to introduce a pop of a favorite color without painting the whole room. This is a simple, modern design technique.
29. Reclaimed Object Wall Art

For a truly unique, low-cost accent wall, use reclaimed objects as your focal point. Instead of traditional art, create a gallery wall using items like antique mirrors, woven plates, or interesting wooden cutting boards. You can source these items affordably from flea markets or thrift stores. Arrange the objects in a visually pleasing cluster, focusing on varying heights and sizes. This adds texture and a collected, personal feel to the space. Ensure all items are securely fastened to the wall using proper hangers. This is a highly customizable and fun DIY.
30. Exposed Copper Pipe Frame

For an industrial or modern look, build a simple decorative frame or linear design using copper piping and elbows. You do not need to connect this to your plumbing. Simply cut the pipe to your desired lengths and assemble the frame using the various elbows and connectors. You can secure the finished piece to the wall with simple pipe clamps. The polished copper adds a beautiful, warm metallic accent. This is a unique architectural detail that requires basic measuring and cutting of the soft copper. It works well as a simple border or a full geometric pattern.
Conclusion:
You now have many distinct, achievable ideas to transform your bathroom with a stunning accent wall. From the graphic simplicity of geometric stencils to the sophisticated texture of board and batten paneling, there is a concept here for every style and budget. Remember that the goal of an accent wall is to introduce personality, texture, or color without overhauling the entire space. Start small, select your materials carefully, and embrace the DIY process. Even a simple can of paint or a few inexpensive wood strips can make a dramatic difference. You can achieve a high-end, custom appearance with simple, affordable actions.